|
Bread & Sourdough Baking
Sourdough Bread Log
Standard Bread Log
|
|
Sourdough Bread Log &
Experiments |
|
|
|
When I first
decided to get into sourdough baking, I wanted to be sure
that the starter I used had all the correct amounts of wild
yeast and good bacteria. After doing a little research
online, I found that Amazon had a couple options to choose
from. Based on customer reviews, I went with the
Breadtopia starter. As I was building up that starter
to use for the first time, I also got my own sourdough
starter going using some whole wheat flour and distilled
water. I usually pull some starter out of each one and
combine for my bread, but I also did a side-by-side
comparison of the two in a recipe below. My home-grown
starter has much more subtle tartness than the Breadtopia
version. I may have to play around with creating a
third starter using some ground up malted wheat or barley,
which contain lactobacillus on the husks that might increase
the tartness of that starter.
Breadtopia (from Amazon) – Started 9/20/2020
-
Built up using instructions from website and used on
my first loaves
-
Definitely produces a tart loaf. The first loaf
I made with this starter was almost too tart for me, but I
have since come to appreciate the flavor.
Home-Grown Starter #1 – 9/23/2020
-
https://www.kingarthurbaking.com/recipes/sourdough-starter-recipe
-
Used 1 cup Hy-Vee Wheat Flour to start with ½ cup
distilled/bottled water
-
Fed with 1 cup Hy-Vee Bleached AP Flour each time
with ½ cup distilled/bottled water for 3-4 cycles, and
discarded half or more of the starter each time.
-
Fed & put in fridge on 9/28
|
|
|
|
Link:
https://www.tasteofhome.com/recipes/crusty-homemade-bread/
I use the rustic crusty bread recipe listed above & below
for the majority of my standard loaves. I may sub
different flours (wheat, rye, etc) in for a portion of the
total and adjust flour & water based on how much sourdough
starter I'm using for a particular batch, but the ratios are
pretty solid for a wetter dough.
Recipe (4 small loaves or two larger loaves)
- 6.5 cups bread flour
- 1.5 TB salt -
3 cups warm water
- Sourdough starter (adjust water & flour above depending on
how much starter is used and how wet or stiff it is)
- OR 1.5 TB instant yeast if making standard bread (reduce
bulk rise & proofing times)
Process:
Mix flour & salt together in large mixing bowl. Mix warm
water & sourdough starter in a separate smaller bowl and add
to dry ingredients. Mix with a wooden spoon until a
shaggy dough comes together. It will seem a little wet
compared to dough that is kneeded to develop gluten, so
don't worry if it's a little sticky. Sprinkle a little
flour on top, cover, and let rest until it's doubled in
size. This will take a few to several hours depending
on room temp and how active your starter is.
When the dough has doubled, pour it onto a floured counter
and cut in half (or fourths if making smaller loaves).
Form into balls and put into floured proofing baskets coated
liberally with rice flour. Cover and let the dough
rise on the counter for a couple hours at room temp or in
the fridge overnight.
Preheat oven with dutch oven(s) inside to 450 degrees.
Right before you're ready to bake, sprinkle some cornmeal on
top of the proofed dough in the baskets and turn out onto a
piece of parchment paper. Putting the parchment paper
on a cutting board and then flipping that way helps to avoid
a mess. Cut some handles on the longer ends of the
parchment paper around the loaves to make handles for
dropping into the dutch oven. Score the loaves in
whatever pattern you'd like. Drop the dough into the bottom
of the dutch ovens using your parchment sling and put on the
lid. Bake for 20 minutes with the lid on. After
20 minutes, remove the lid, lower the oven temperature to
400 degrees, and
bake for an additional 20-30 minutes. Check the loaves
after 15-20 minutes to make sure the tops don't start to
burn. You can tell your loaves are done by inserting a
digital thermometer in the center of the loaf, and it should
ready 205 degrees or slightly higher. Once baked, let
the loaves cool on a cooling rack for at least 2-3 hours
before cutting to avoid a gummy crumb. |
|
|
|
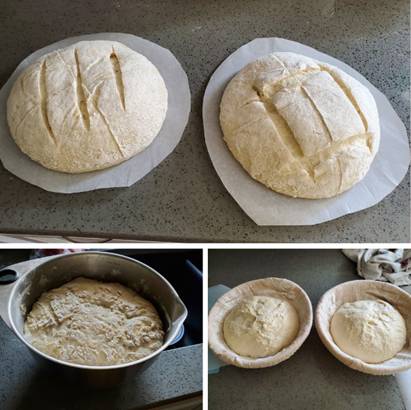 
Recipe: Similar to this one, which is my standard
recipe
https://www.tasteofhome.com/recipes/crusty-homemade-bread/
Process:
-
Add flour & salt to bowl and mix to combine
-
Mix in ½ cup fed sourdough starter (Breadtopia first
use) & 1.5 cups warm water together and add to dry
ingredients
-
Stir to combine into wet dough, cover, and leave on
counter overnight for bulk rise
-
Next Morning: Shape dough into 2 balls, add to
floured proofing baskets, and let rise for a few hours until
doubled in size
-
Bake at 450 degrees on backing stones for 20 minutes
or until top is brown
o
Use ban below stones to add water/steam to in
order to make more crunchy crust
-
Let cool before cutting
Overall Impression: These loaves were pretty tart
overall! Much more tart than I was expecting, but Rachel
really liked them with Kerrygold butter. I would like a but
less tartness, so I will look into methods of getting less
tang.
|
|
|
|
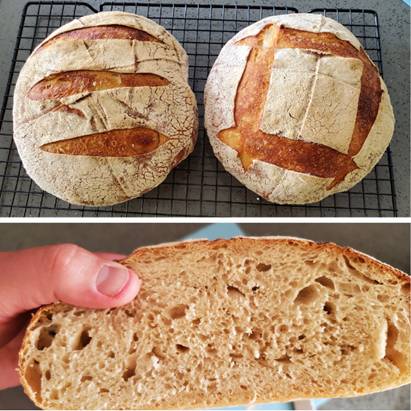
Recipe: Similar to rustic bread above that I’ve been
baking for the past 6 months or so
-
Use slightly less water to account for liquid in fed
starter
Process:
-
Use 1 Cup discarded Mike #1 SD Starter mixed with 1.5
cups warm water to combine
-
Add flour, salt, and ½ tsp instant yeast to bowl,
combine, and mix in liquid to form a somewhat wet dough
-
Let rise on the counter for 3 hours
-
Split dough & form balls and place into floured
baskets (no liner this time)
-
Let rise for 2 hours
-
Bake one at 450 for 22 minutes using standard method
-
Bake the other in pre-heated Dutch oven (lower loaf
into pot with parchment, put on lid, and cook
o
20 minutes with lid at 450 degrees & another
10-15 minutes uncovered at 425 until the crust is slightly
brown but not burnt
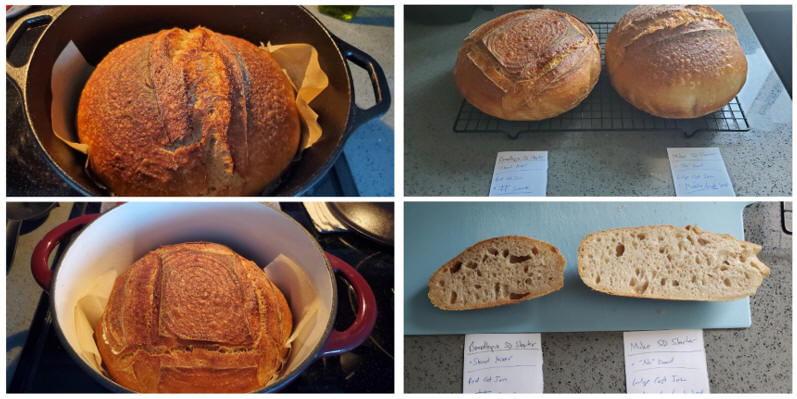
Overall Impression: The dutch oven process did
provide a bit more rise in the dough during baking, and I
also got a bit of an ear on the slice I made on the bottom
side of the loaf before baking. I will play around with
this method a bit more and see what I come up with.
|
|
|
|
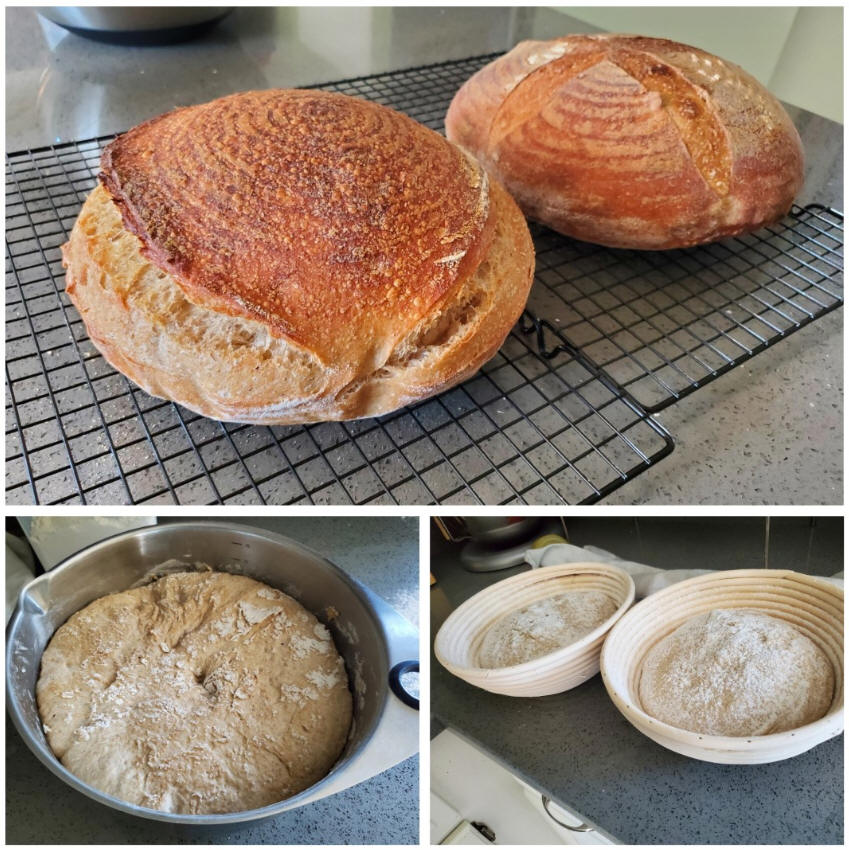
Recipe:
-
3.5-4 cups Sam’s Club Bread Flour
-
¾ cup Hy-Vee Whole Wheat Flour
-
2 cups warm water
-
2 tsp salt
-
Mixed SD Starter (wet, around 2 cups)
Process:
-
Let both SD Starters (Breadtopia & Mike) sit on the
counter overnight to ferment out of the fridge. In the
morning, I scooped out all but ½ cup of each starter and put
discard in a bowl. Fed both starters along with the discard
with around ¾ cup of AP flour & 1/3 cup water. Let the
discard ferment on the counter for 3 hours until it was
bubbly and then mixed it in with the other ingredients in
the Kitchenaid mixer. Mixed until a wet dough formed. Let
the dough sit for 20 minutes, and then mixed for 30 seconds
or so on medium-high to build gluten. Repeated another 2
more times at 20-minute intervals, and then I let it sit to
bulk ferment unattended for another 5 hours. Split dough in
half, formed into balls, and added to floured (rice flour)
proofing baskets. Covered the baskets with plastic wrap &
basket liners on top and put in the fridge to cold proof
overnight. Took one loaf out of the oven about an hour
before the bake to warm up. This loaf ended up spreading out
a bit when I flipped it onto the parchment. There were more
large holes in the crumb of this loaf than the one that was
put directly into the dutch oven from the fridge.
Overall Impression:
-
Firm tartness in this batch, and everything turned
out great! I will continue this method of using the discard
from each of my starters and then building that up to make
bread or other recipes.
|
|
|
|
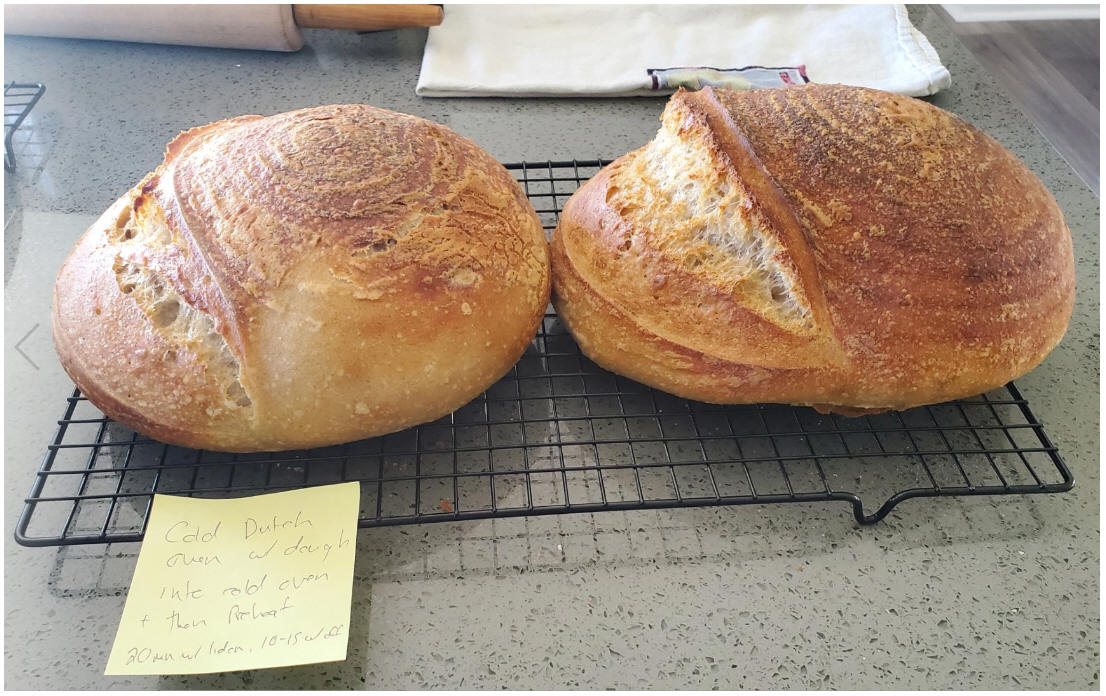
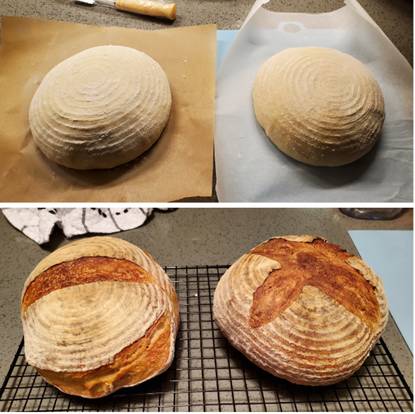
Recipe:
Basic recipe listed above but cut roughly in half.
Process:
The dough was bulk fermented together and split & formed
into two proofing baskets for an overnight rest in the
fridge. On the day of the bake, I pulled one of the baskets
out of the fridge, dumped it onto parchment paper, and
lowered it into a cold dutch oven and put on the lid. At
that point, I started preheating the oven to 450 degrees.
After the oven was preheated, I performed the same steps to
drop the other loaf into the hot dutch oven and put on the
lid. I ended up baking both at this point for 20 minutes
and then removing the lids & dropping the temp to 425.
After another 14-20 minutes, I removed the loaves from the
pans and let them cool on the rack.
Overall Impression:
The flavor was the same on both of these loaves, but I was
really interested in what would happen with the oven spring
and rise of the loaves. The cold oven loaf didn't seem
to get quitethe same amount of oven spring as the preheated
loaf, and the ear was not quite as pronounced.
Overall, there wasn't a ton of difference between the look
and crumb of each loaf, but this ezperiment confirmed that
the preheated ductch oven is the way I want to continue
going moving forward.
|
|
|
|
Recipe & Process:
-
Used basic recipe and process above to make two
larger loaves. Replaced 1.5 cups of bread flour with Hy-Vee
whole wheat flour. Proofed overnight in fridge in
baskets. Baked both loaves in pre-heated dutch ovens.
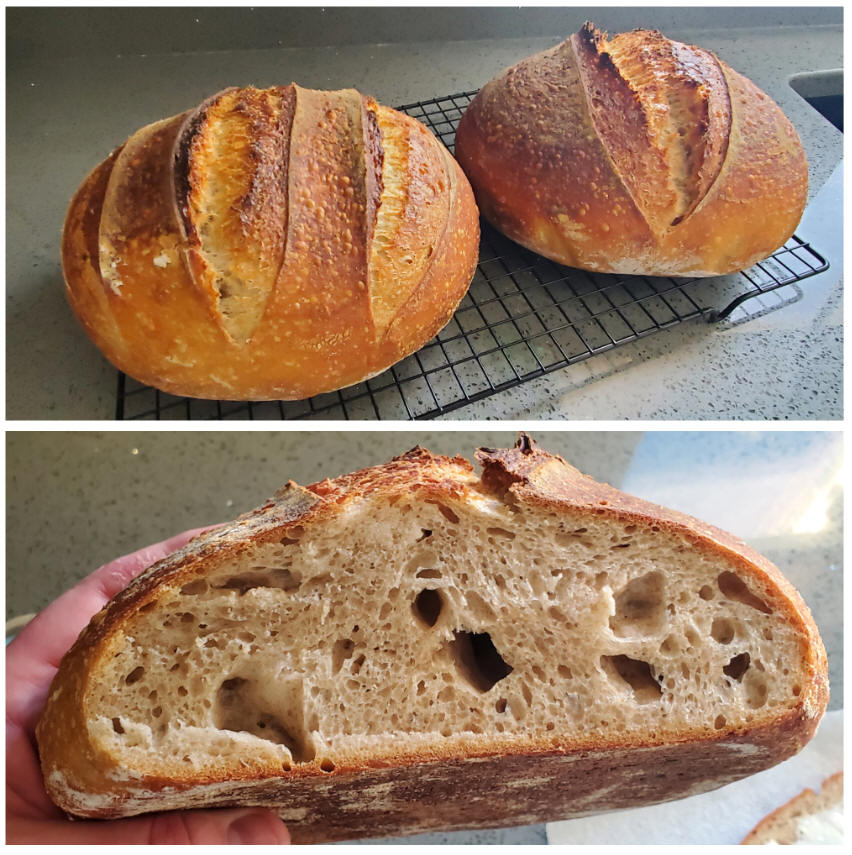
Overall Impression:
-
Both loaves were very good, but the Breadtopia had a
much more pronounced sourness than my Mike starter. The
Mike batch still had a subtle sourness, but about half or so
as much as the Breadtopia batch. I may try making another
sourdough starter in the future using some ground up malted
wheat or barley based on a suggestion by a fellow brewer
since malted grain naturally has lactobacillus on the
outside of the kernels.
|
|
|
|
Recipe & Process:
Used standard recipe but replaced 1 cup of the bread flour
with Hy-Vee whole wheat and made two larger loaves. Also
added 1TB of Maggi seasoning to the dough prior to mixing.
I meant to reduce the amount of salt since Maggi is kind of
salty, but I forgot. Overnight proof in fridge. Baked in
preheated dutch ovens.
Overall Impression:
I tried a small slice of the heal at room temperature after
cooling, and I didn’t really pick up any of the Maggi flavor
or aroma. I decided to toast a slice to have with butter,
and that really brought out the aroma! The flavor was also
increased after toasting. Overall, I think the 1TB amount
per two larger loaves was about right. It would still be
fine to eat this bread with other savory spreads or with
meals without the Maggi totally overwhelming the overall
sourdough and grain flavor. I think I’m going to try
something similar with some Premium soy sauce I got at the
Asian market that’s a bit too salty to use on its own. I
will need to make a note to reduce or remove the salt
addition for that batch though.
|
|
|
|
Info: I
had a friend suggest adding some crushed malted wheat malt
to my homemade starter to increase acidity since it's a bit
on the mild side. I never thought of this before, but
it totally makes sense considering malted grain has a bunch
of lactobacillus on it naturally. So I blitzed around
1 cup of wheat malt in my coffee grinder until it was
medium-fine in texture. I added that to my Mike SD starter
along with a bit of water, mixed, and put into the fridge
until I want to use it again. I thought about keeping the
starter at room temp for another day, but I really didn't
need to bake again this week, so I put it in the fridge
along with the Breadtopia starter to wait until I bake
again. I plan on building up the starter maybe a
couple times and then do another side-by-side comparison
between the two starters and see if my Mike SD starter has
increased in acidity at all. |
|
Contact Information:
MikeYoungHB
at gmail.com
*As an Amazon Associate I earn from qualified purchases*
|
|