|
10 Gallon Brew System
5 Gallon All-Grain
Brewing
Beer
Log
Brewing Tips & FAQ
Brewzilla System &
Mods
Build a Keg Washer
Concentrated Brewing
Exhaust Fan/Vent
Hood
Extract w/ Grains Brewing
Fermentation Fridge/Freezer
Fermzilla Conical
Hard Cider
Recipe
Hard Seltzer
(MikeClaw)
Monster Mill
Parti-Gyle Brewing
Saving
& Reusing Yeast
Sour & Funky Beers
Wine & Mead
Chest Freezer Kegerator
Fridge Kegerator
Sanyo Kegerator
Custom Tap
Handles
Keezer Compressor
Fix
Quick & Easy Drip Tray
Bread & Sourdough
Fermented Food
Gun Pictures
Hunting
Smoking Meat
|
|
Brewzilla - Electric
Brewing System & Mods |
|
|
|
I've always liked the idea of brewing inside, but I've never
wanted to really dedicate a room or large space to a brew
stand. With more and more portable electric brew
systems coming out each year, and with winter fast
approaching, I decided it was time to try one out. I
settled on the Brewzilla (formerly the RoboBrew) 35L 110v
system. I got everything I needed for around $450,
which is a pretty good deal considering what's included.
Along with the new brew system, I decided to install an
Exhaust Fan/Vent Hood in the
basement so I could brew down there year round if I wanted
to. This system doesn't put off a ton of moisture, but
if I decide to use this in the middle of summer, I didn't
want all that extra humidity floating around the house.
There are a ton of how-to videos, reviews, and pros & cons
lists out there, so I won't go into too much detail here.
Overall, my experience after several batches has been very
positive with this system, and I very much enjoy having the
option to brew inside and not drag out my larger propane
setup for a brew. I've included several tips and
modifications to help make your Brewzilla (BZ) system the
best it can be. Enjoy!
|
|
|
There's a ton of info online about using the BZ, and after
sorting through all that and a bit of my own experience,
here are a few helpful tips for those just getting started
with this system:
Use More Mash Water!
There is about a gallons worth of dead space under the
bottom screen of the BZ before your grains even come in
contact with any mash water, so you definitely need to use
more mash water compared to traditional cooler mash tuns.
I found that I need to use at least 2qts of water per lb of
grain. Anything less than that, and your mash will be
way too stiff to stir efficiently and you risk dry spots of
grain that won't convert.
Plan for Longer Heating Time
One of the downsides of the 110v BZ system is how long it
takes to heat the mash water and bring your wort to a boil
after the mash. Just be sure you account for this on
brew day. With my propane system, heating mash water
and bringing to a boil only takes around 15 minutes, but
it's closer to 40-45 with the BZ. That's not a big
deal if you're in a hurry, but it's something to keep in
mind when planning a brew day.
Lower Boil-off Volume
I found that the boil-off volume was about half that of my
propane setup after running through a few brews. I
don't boil too hard on my propane system, but the BZ is
limited to what the two elements can provide, and I've found
that isn't too strong of a boil. I would suggest
trying to find a custom BZ profile for your brewing software
to help hit your numbers more accurately. There are
several floating around online for the various brewing apps
out there. |
|
|
|
There are a few
Add-Ons for the Brewzilla system that I got right away when
I bought the system, and a couple I added later on.
Below I have listed some of the add-ons that I would
recommend, along with a couple things that aren't really
add-ons for the system itself, but helpful things to have
when using the system.
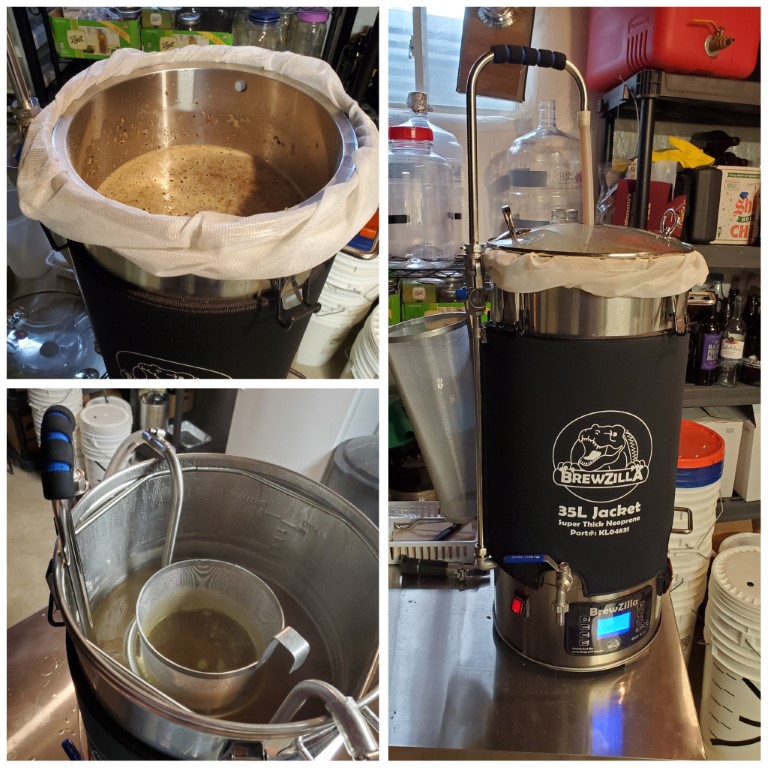
Neoprene Jacket
With the lower 110v BZ system, having some extra insulation
around the unit really helps when heating mash water and
maintaining a boil. Just remember to take the jacket
off when chilling so you're not holding in the heat at that
point.
Whirlpool Arm
With my propane system, I always stir my wort as I'm
chilling to increase efficiency. Since the BZ has a
built in pump, it can do that work for you with the
Whirlpool Arm add-on. Along with increasing your
chilling efficiency, it also creates a trub pool in the
middle of the unit so it makes it easier & cleaner to either
pump or drain your wort into the fermenter after it has
chilled down.
Hop Spider/Strainer
Not necessarily an add-on to the BZ unit itself, but it
definitely helps to keep hop material from plugging up the
bottom screen of your BZ system. I tried a few
different hop spiders/strainers with this system, with some
being too small & others being too large to fit inside the
chiller, and this one ends up working perfectly. It
sits down into the wort during the boil and will also fit
inside the chiller when you add that with 10-15 minutes left
in the boil, since the bottom of the strainer is smaller
than the top.
BZ Chiller Tubing
Kit
The BZ system
comes with a chiller, but for some reason it doesn't come
with any tubing or connectors. I suppose this allows the
buyer to configure the chiller in a way that works best for
them. I have a brew sink in my basement, so I wanted a
garden hose setup on mine. I have included a link
below to a kit you can buy to setup the chiller, but you
could also just make a trip to the hardware store and grab
all these things for a little cheaper as well.
Stainless Table
Another not specific to the BZ add-on, but I would highly
recommend the stainless table below. I started out
using a heavy-duty plastic cart that I use for bottling and
other brewing tasks, but after a couple brews, I knew I
needed something stainless and more sturdy. After
searching for several different tables and different sizes,
I found this table, and it has worked great for me! It
fits the BZ system perfectly with some room on the side to
work as well. It has locking wheels so you can park it
in place without worrying about it rolling off while you're
boiling or chilling. Overall, I've been very happy
with this table, and the price is right as well. |
|
|
|
|
The BZ system
is pretty solid out of the box, but I found a few things
that could use improvement after a couple brews and doing
some searching online. Below I have listed a few
things that I have done to improve my BZ system. I
would suggest you try brewing at least one batch with the
system as-is before modifying it though. But
definitely add the larger lid handles no matter what,
because the tiny handles that it comes with is just asking
for a broken glass lid.
Larger Lid Handles
The handles for the lid that come with the BZ system are
very small and become quite slippery when wet. After a
couple brews, I realized it was just a matter of time before
I dropped the glass lid if I didn't make a change.
After searching on some of the BZ forums, I was able to find
some handles that
would fit the BZ and provide a much better grip. I was
a little worried about them being metal and potentially
conducting heat through the glass, but that hasn't been a
problem. at all.
Remove Overflow Tube
& Plug
The BZ comes with an overflow tube that screws into the
bottom screen of the inner malt tube. This prevents
the system from potentially overflowing if you are
recirculating during the mash and don't have good flow
through the grain. The problem I ran into was that
with a metal tube in the middle of the tall & thin malt
tube, it makes it very difficult to mash in and stir grains
into my mash water. That only lasted one brew before I
needed to find something different. Others seem to
have the same issue, and BZ even makes a screen that you can
buy that doesn't use the overflow tube. I'll likely
buy one of those in the future, but in the meantime, I found
a bolt/plug at the hardware store that works for now.
I found something similar on
Amazon, but you can
just take your screen to the local hardware store as well
and try out some bolts/plugs to see if one fits for you as
well.
Mesh Bag In the
Bottom Of the BZ
I mill my grains pretty fine for my propane system with a
cooler mash tun, and when moving to the BZ system, I found
that grain particles were getting through the bottom screen
and making it into the boil. Luckily this didn't cause
any astringency or tannin issues on my first brew, but I
wanted to figure out a way to keep that grain out of my
boil. A very simple solution is to use a
large mesh bag made
for Brew in a Bag (BIAB) brewing. I put the bag inside
the BZ system and then put the malt tube inside the bag.
When it's time to sparge, I pull up the malt tube, but I
leave the bag in the bottom of the BZ while sparging.
After the sparge is done, I remove the malt tube, and then
remove the mesh bag that has collected quite a bit of grain
material. This has made my boils so much cleaner, and
now I don't have to worry about grain making it from the
mash into the boil. |
|
Contact Information:
MikeYoungHB
at gmail.com
*As an Amazon Associate I earn from qualified purchases*
|
|