|
10 Gallon Brew System
5 Gallon All-Grain
Brewing
Beer
Log
Brewing Tips & FAQ
Brewzilla System &
Mods
Build a Keg Washer
Concentrated Brewing
Exhaust Fan/Vent
Hood
Extract w/ Grains Brewing
Fermentation Fridge/Freezer
Fermzilla Conical
Hard Cider
Recipe
Hard Seltzer
(MikeClaw)
Monster Mill
Parti-Gyle Brewing
Saving
& Reusing Yeast
Sour & Funky Beers
Wine
& Mead
Chest Freezer Kegerator
Fridge Kegerator
Sanyo Kegerator
Custom Tap
Handles
Keezer Compressor
Fix
Quick & Easy Drip Tray
Bread & Sourdough
Fermented Food
Gun Pictures
Hunting
Smoking Meat
|
|
Fermzilla Conical
Fermenter |
|
|
|
|
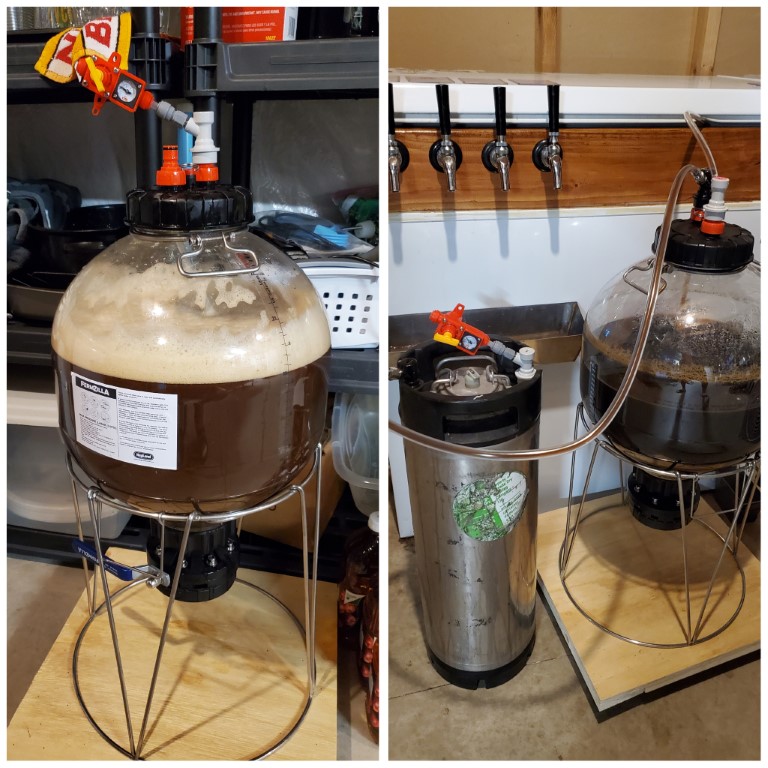
I've always
liked the idea of getting a conical fermenter, but the
stainless options out there were just too expensive for me
to try out. After reading good things about the
Fermzilla (both the Conical and All Rounder), I decided to
try out the Conical option. I wanted the option to
save my yeast as well as use the collection vessel to add
dry-hops to the fermenter without introducing additional
oxygen. The other big benefits of this fermenter is
being able to ferment under pressure and to transfer to a
keg under pressure as well. Oxygen uptake has become a
hot topic over the last couple years, especially when it
comes to hoppy & hazy styles, so I wanted to see if I got
better results out of the Fermzilla compared to my standard
plastic buckets.
So far, I've only brewed a couple lagers in the Fermzilla
Conical, so I can't speak to what kind of difference it
makes on either lagers fermented under pressure or how
adding hops under CO2 pressure can potentially improve hop
flavor & aroma in the finished beer. Once I have a few
batches under my belt, I'll post my results back here. |
|
|
|

With the simple
metal base of the Fermzilla Conical fermenter, I knew I
wanted to make that more mobile, considering I would need to
move the fermenter closer to my keezer where I have my CO2
tank and hoses. I thought a simple wooden base with
four castors would fit that task nicely. After getting
my Fermzilla and measuring the base, I headed to the
hardware store to pick up some supplies. I bought a
half sheet of 1/2" plywood, 4 spinning castors, and I ended
up finding some cheap scrap wood to help reinforce the base
in a discount bin that ended up working perfectly.
Once I got home, I measured the base of the Fermzilla, added
a couple inches, and ended up cutting an 18" square piece
out of my 1/2" plywood sheet. Once that was done, I
cut the scrap wood to size to form a support on the bottom,
air nailed them in place, and screwed in my rolling castors
on each corner. I should probably apply a couple coats
of polyurethane to the top of the cart since it'll be around
beer and moisture, but that can be a task for another day. |
|
Contact Information:
MikeYoungHB
at gmail.com
*As an Amazon Associate I earn from qualified purchases*
|
|